Gnocchi 使用原理及源码分析-上

生活的模样很残酷,再苦再累,你都不能放弃,因为无路可退,进一步或许你会看到一方的壮阔苍旻;退一步或许你会万劫不复。你无法选择出生,但你可以选择奋发向上,用自己的辛劳和汗水去创造属于自己的人生,努力让自己过上自己想要过得生活。

Gnocchi 介绍

简介

之前我们已经介绍过了pasteWSGIpecan等内容,每一个知识点,我们都详细分析了使用方式,pecan还分析了源码,下面我们就结合之前的几个知识点来分析一个项目的启动过程,以 openstack 项目 gnocchi 为例。

Gnocchi是一个能够高效存储海量监控指标(metric)测量值的系统,其设计目标是能够在云环境中提供时序数据库服务(TDBaaS,Time-series Database as a Service),通过对外暴露HTTPREST API来创建和操作各种监控资源的属性和各项监控指标的测量数据,最终实现了监控指标测量值的查询与存储的数据规模无关。Gnocchi最初由Julien Danjou于2014年发起,旨在为Ceilometer项目解决其最初利用传统关系型数据库作为监控数据存储后端时,遇到的扩展性问题,提供存储海量监控数据的服务。

架构

Gnocchi的架构实际上并不复杂,主要由三个服务组成:一个HTTP REST API服务(gnocchi-api),一个异步处理监控数据的守护程序(gnocchi-metricd)和一个可选的statsd兼容的守护程序(gnocchi-statsd)负责监听通过TCP或者UDP发送的计量数据。监控数据由HTTP REST API服务和statsd守护程序负责获取,而metricd守护程序则在后台负责对获取的数据进行各种操作,包括测量值的计算和聚合,过期监控指标的清除等。其中,API服务和metricd守护程序都是无状态的,可以轻松的根据负载情况进行扩展。

img

从图可以看出Gnocchi的服务主要包含两大服务,API和Metricd服务。同时可以看到有三个存储,Measure Storage、Aggregate Storage和Index。

Measure Storage:是经过ceilometer-agent-notification服务处理后发送过来的数据,是实际的监控数据,但这些数据还需要经过gnocchi服务处理,处理后就会删除掉。比如这部分数据就可以保存到file中,当然也支持保存到ceph,但这属于临时数据,所以用file保存就可以了。

Aggregate Storage:Aggreate是总数、合计的意思,gnocchi服务采用的是一种独特的时间序列存储方法,这个存储存放的是按照预定义的策略进行聚合计算后的数据,这样在获取监控数据展示时速度就会很快,因为已经计算过了。用户看到的是这层数据。后端存储包括file、swift、ceph,influxdb,默认使用file。可以保存到ceph中,这样可在任意一个节点上获取,但由于存储的都是大量小文件,大量的小文件对ceph来说并不友好。

Index:通常是一个关系型数据库(比如MYSQL),是监控数据的元数据,用以索引取出resources和metrics,使得可以快速的从Measure Storage和Aggregate Storage中取出所需要的数据。目前支持4种drivers,PostgreSQL(首选),MySQL(至少版本是5.6.4),
这些drivers提供了大多数相同的性能和特性,PostgreSQL具有更高的性能并且有一些额外的特性(例如 资源持续时长计算)。

API:gnocchi-api服务进程,可以托管到httpd服务一起启动,通过Indexer和Storage的driver,提供查询和操作ArchivePolicy,Resource,Metric,Measure的接口,并将新到来的Measure(也就是ceilometer-agent-notification发送到gnocchi-api服务的数据)存入Measure Storage。

Metricd:gnocchi-metricd服务进程,根据Metric定义的ArchivePolicy规则周期性的从Measure Storage中获取未处理的Measure数据并进行处理,将处理结果保存到Aggregate Storage中,同时也对Aggregate Storage中的数据进行聚合计算和清理过期的数据。

1
gnocchi-metricd daemon会测量所有你的CPU功效来最大化CPU使用,当计算metric聚集。你可以使用gnocchi status命令查询HTTP API 获取监控项处理的聚集状态,它将会显示多少个监控项metric正在处理,正如处理存储的gnocchi-metricd。只要积压未办的时请不是持续增长,这意味着gnocchi-metricd能够处理正在被发送的个数的监控项。假如正在处理的measure的数量持续上升,你需要增加gnocchi-metricd daemons。你可以在任意数量的服务器上运行任意数量的metricd-daemon。

API和Metricd服务都是设计成了无状态的服务,可以横向拓展来加快数据的处理。

存储

gnocchi 目前支持不同的存储后端:

File(默认),Ceph(首选),OpenStack Swift,S3,Redis

这些后端是基于名叫Carbonara的中间件,该中间件是用来处理时间序列的操作,因为上述存储技术无法处理时间序列。Carbonara对于后面上述的支持是比较好的,并且是易于扩展的。Ceph和Sift原本就是比文件driver更具有扩展性的。根据你系统的大小,使用file driver并且存储你在磁盘上的数据一般各哦吟咏了。如果你需要扩展为数台服务器,你可以通过NFS来贡献数据。S3,Ceph和Swift drivers更容易扩展。Ceph提供了更好的一致性,因此推荐用Ceph。

可以在安装时进行指定:

1
2
3
4
5
6
7
8
9
10
11
12
13
14
15
16
17
18
19
20
21
22
pip install gnocchi
根据系统的架构所需要的drivers和特性,安装时需要携带额外的参数
pip install gnocchi[postgresql,ceph,keystone]
着将会安装postgresql来支持indexer driver,Ceph支持存储,Keystone支持验证和授权。
下面时可用的变量列表:
keystone:
mysql:支持indexer
postgresql:支持indexer
swift:支持storage
s3:支持storage
ceph:支持storage
ceph_recommended_lib:支持Ceph >= 0.80的storage
ceph_alternative_lib:支持Ceph >= 10.1.0的storage
file:提供file driver支持
redis:提供storage支持
doc:文档构建支持
test:单元和功能性测试支持

为了从source安装Gnocchi,运行python标准的安装程序
pip install -e.
根据drivers和你想使用的特性,你需要安装额外的变量
pip install -e.[postgresql,ceph,ceph_recommended_lib]

其中如果用ceph作为 back-end的话,需要满足以下要求:

1
2
3
4
5
6
ceph需要一个已经创建的Ceph 用户和一个pool。它们可以被以下的例子来创建
ceph osd pool create metrics 8 8
ceph auth get-or-create client.gnocchi mon "allow r" osd "allow rwx pool=metrics"

Gnocchi收录了python中的一些特性(omap, async,操作上下文),但是需要python-rados >= 10.1.0【rados是用于控制集群的】。为了处理这种情况,Gnocchi使用cradox python库,使其和相同的API工作相同,但是只需要Ceph >=0.80.0
如果Ceph和python-rados 都>=10.1.0,cradox python库会编程可选的,但仍然推荐这样做。

指标

Gnocchi中有三层数据,resources -> metric -> measure

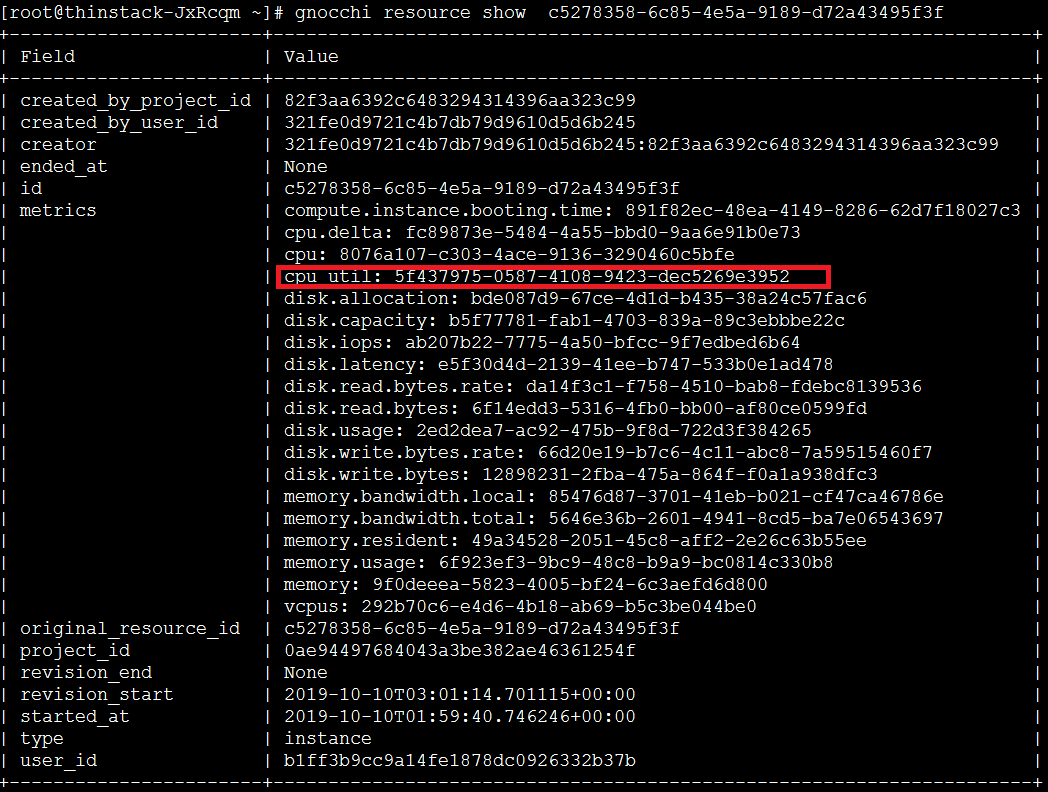
Resource:是gnocchi对openstack监控数据的一个大体的划分,比如虚拟机的磁盘的所有监控资源作为一个resource,可用命令gnocchi resource list查看

Metric:是gnocchi对openstack监控数据的第二层划分,归属于resource,代表一个较具体的资源,比如cpu值,可用命令gnocchi metric list查看

Measure:是gnocchi对openstack监控数据的第三层划分,归属于metric,表示在某个时间戳对应资源的值,可用命令gnocchi measures show metric_id

在Gnocchi中,一个时间序列是点的集合,在时间序列中的每一个点都有measure或者采样值sample。存储格式会被各种技术压缩,因此计算时间序列的大小在最坏情况下被下面的公式计算:

1
2
3
点的个数 * 8byte = 时间序列大小
点的各数可以被下面的公式确定
点的个数 = 持续时间 / 粒度

时间序列处理:

1
2
3
4
5
6
7
8
9
10
11
12
13
metric的measures到Gnocchi,这些值会被动态聚集。着意味着Gnocchi并不存储所有发送的measures,而是在一个时间段聚集它们。
Gnocchi提供了几种不同的内置聚集函数。
一个归档策略被指定的field中调集集合所定义。每一个条目组成了时间跨度并且京都层次需要被提供,决定了至少使用:2个points,granularity和timespan字段。例如,一个条目会被定义为超过1小时的12个点(每个点5分钟),或者针对天的每小时一个点(24个点)。
默认地,新的带有measures的timestamps的可以在聚集的时间段中被处理。上一次聚集时间段的大小是根据归档策略中最大的granularity。为了允许处理比该时间段更旧的measures,back_window 参数可以被用于设置保存粗略的时间段。
back_window:2表示可以收集两个小时之前的数据
具体参见:https://docs.openstack.org/developer/gnocchi/rest.html

改变聚集方法通过指定聚集参方法列表,在aggregation_methods中修改
删除加上前缀 -max,添加用+, *表示所有
一旦归档策略被创建,会返回所有属性,归档策略的URL
GET /v1/archive_policy/short HTTP/1.1
Content-Length: 0
已经存在的归档策略可以被修改用来保留更多或者更少的数据。归档策略覆盖可以扩展,

示例

通过resource找metric

gnocchi resource show resource-id
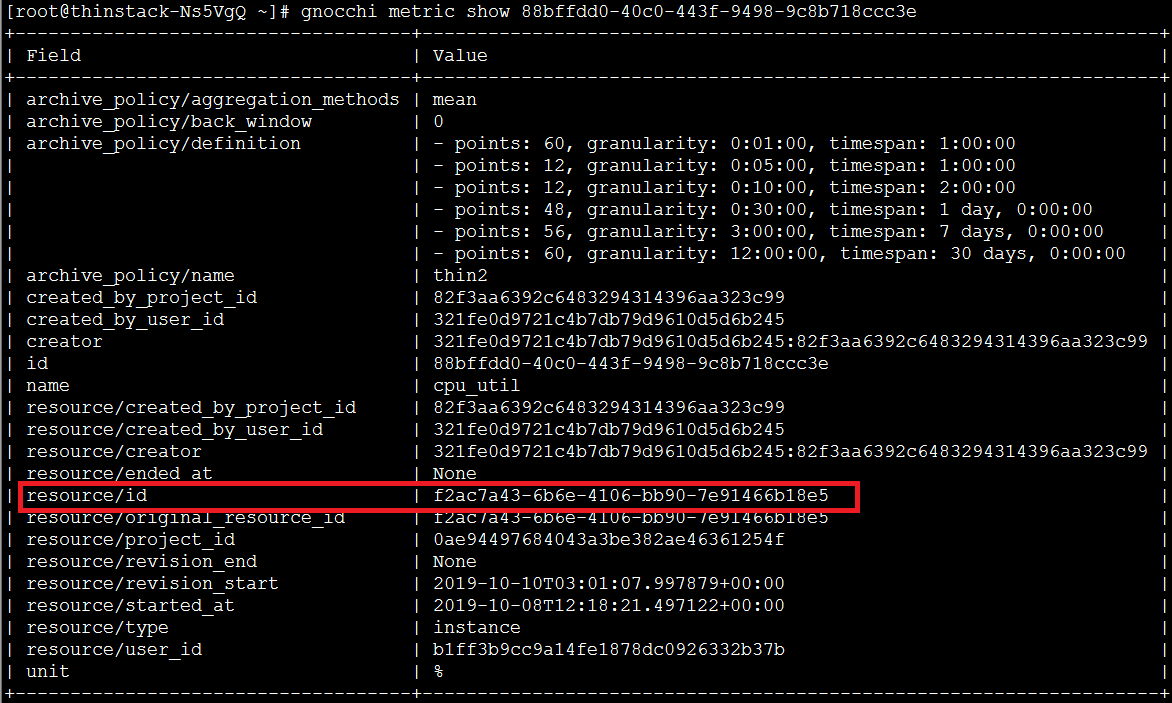
img

查看 metric 属性

gnocchi metric show metric-id

img

通过 metric 找 measures

img

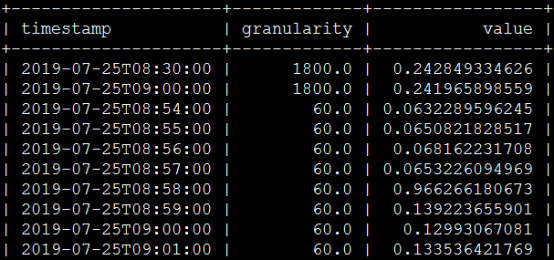
中间那个granularity值表示采集时间间隔,60表示60秒,1800表示30分钟,这个取决于我们自己设定的聚合计算策略,我这边设的策略如下:

image-20210718160627046

归档

归档策略表示最后数据存储到后端时是什么形态,间隔多少,保存多久

1
2
3
4
5
6
7
8
> gnocchi archive-policy create -d points:60,granularity:0:01:00 -d points:48,granularity:0:30:00 -m mean thin4
>
> points:60,granularity:0:01:00表示只保存60个点,每个点间隔是1分钟,也就是只保存最新1小时的数据
>
> points:48,granularity:0:30:00表示只保存48个点,每个点间隔是30分钟,也就是只保存最新一天的数据
>
> 一些resource type和要计算的metric都定义在/etc/ceilometer/gnocchi_resources.yaml该文件中
>

Gnocchi中,归档策略定义是被表示为点的数量。如果你的归档策略定义了一个10各点的策略,粒度是1秒,时间序列归档将会维持10秒(有时会多一点),每一种表示是对超过1秒的聚集。这意味着时间序列将会最大保留最新到最老10秒的数据。但这并不意味着这是连续的10秒:可能数据中存在不规则的部分。

因此,归档策略和粒度完全依赖于你的使用情况。你可以定义其中归档策略。一个典型的低度使用的方式
3600 点,粒度1s ,等于1小时
1440点,1分钟,24小时
720点,一小时,30天
365点,一天,一年
这将表示每个聚集方法将花费6125个点 9 = 54 KB空间。如果你使用
8个标准的聚集方法,你的监控项占据的总空间为8
54KB = 432KB
小心定义你的归档策略,它将花费更多的CPU。因此,创建一个归档策略包含两个定义(
每天1秒的粒度粒度和针对每个月1分钟的粒度)将会花费两被的CPU比一个定义(例如:每天1秒的粒度)

默认归档策略

默认3个归档策略会在调用 gnocchi-upgrade 的时候被创建:
low , medium , high
描述了存储空间和CPU使用的需求。它们使用
default_arrgegation_methods
这是默认被设置为 mean , min, max , sum , std, count
一个fourth archive policy叫做bool的也默认被提供了。这仅仅用于存储boolean 值(例如,0和1).它仅仅为每一秒存储1个data point(使用 最后的聚集方法),是一年的保留时间。
最好的存储大小是被如下假设:除了0和1作为测量值measures被发送。如果其他的值被发送,最坏情况下的最大存储大小会被考虑在内。

1
2
3
4
5
6
7
8
9
10
11
12
13
14
15
16
17
18
19
20
21
Low:
超过30天的5分钟的粒度
使用的聚集函数:默认聚集函数
每个监控项metric最大空间大小:406KB

Medium:
超过7天的一分钟的粒度
超过365天的1小时粒度
使用的聚集函数:默认聚集函数
每个监控项metric最大空间大小为:887KB

high:
超过1小时的1秒粒度
超过1星期的一分钟粒度
超过1年的1小时粒度
使用聚集方法:默认聚集方法
每个监控项metric最大空间大小为:1057KB

超过1年的bool* 1秒的粒度,使用: las* 最好情况小大小为:
1539 KB * 每个监控项最坏情况下大小: 277 172KB
约277MB

Gnocchi 源码

之前我们分析过了 wsgi 、 pecan 和 paste 的相关知识,今天梳理一下 Gnocchi 的代码,顺便温习一下。

基于O版

api-server

在源码结构中 rest 目录是api转化为gnocchi可以处理请求的入口类,包含了许多Controller方法。由于gnocchi采用pecan(对象路由web框架来获取资源),这个文件提供的方法就是解析传递过来的url,通过对应方法解析后执行相关命令。

__init__.py :比较重要的方法包括:

  • MetricController(继承自rest.RestController,提供post_measures添加测量值数组,获取某个监控项测量值列表方法get_measures);
  • MetricsController(根据监控项id解析得到监控项交给MetricController处理);
  • NamedMetricController(可根据监控项名称查询到监控项,根据资源id,类型,监控项列表来更新资源);
  • MetricsMeasuresBatchController(重要,监控项测量值批处理控制器,实际上就是遍历每个监控项,将每隔监控项的采样值列表添加到数据库中)。

app.py :app.py是pecan应用的入口,包含应用初始化代码。

  • hooks对应的配置是一些Pecan的hook,作用类似于WSGIMiddlewareGnocchiHook类(提供在Pecan尝试将一个请求分发给控制器的之前被调用)的函数on_route)
  • load_app方法(Paste.Deploy主要是用来载入WSGI中的WebApp使用,其核心函数是loadapp()通过loadapp函数和一个配置文件或者egg包来载入WSGI应用,一个配置文件后缀为ini,内容被分为很多段):实际上是获取storage,indexer数据库驱动器,然后部署生成app并返回。
  • build_server(): 执行: service.prepare_service(),执行: serving.run_simple

app.wsgi :主要调用conf = service.prepare_service(),application = app.load_app(conf)

我在部署 gnocchi-api 的时候使用的是 apache + mod_wsgi ,这种都是需要指定 wsgi 文件的位置,比如,我们可以如下配置:

1
2
3
4
5
6
7
8
9
10
11
12
13
14
15
<VirtualHost *:8041>
WSGIDaemonProcess gnocchi processes=2 threads=1 user=gnocchi group=gnocchi display-name=%{GROUP}
WSGIProcessGroup gnocchi
WSGIScriptAlias / "/usr/lib/python2.7/site-packages/gnocchi/rest/app.wsgi"
WSGIApplicationGroup %{GLOBAL}

ErrorLog /dev/stderr
SetEnvIf X-Forwarded-For "^.*\..*\..*\..*" forwarded
CustomLog /dev/stdout combined env=!forwarded
CustomLog /dev/stdout proxy env=forwarded

<Directory "/usr/lib/python2.7/site-packages/gnocchi/rest">
Require all granted
</Directory>
</VirtualHost>

可以看到第四行指定了wsgi启动的路径,我们看下这个目录:

1
2
3
from gnocchi.rest import app

application = app.build_wsgi_app()
1
2
def build_wsgi_app():
return load_app(service.prepare_service())
1
2
3
4
5
6
7
8
9
10
11
12
13
14
15
16
17
18
19
20
21
22
23
24
25
26
27
28
29
30
31
32
def load_app(conf, indexer=None, storage=None,
not_implemented_middleware=True):
global APPCONFIGS

# NOTE(sileht): We load config, storage and indexer,
# so all
# 配置 back-ends driver
if not storage:
storage = gnocchi_storage.get_driver(conf)
if not indexer:
indexer = gnocchi_indexer.get_driver(conf)
indexer.connect()

# Build the WSGI app
# 这里去加载api-paste.ini文件路径
cfg_path = conf.api.paste_config
if not os.path.isabs(cfg_path):
cfg_path = conf.find_file(cfg_path)

if cfg_path is None or not os.path.exists(cfg_path):
raise cfg.ConfigFilesNotFoundError([conf.api.paste_config])

config = dict(conf=conf, indexer=indexer, storage=storage,
not_implemented_middleware=not_implemented_middleware)
configkey = str(uuid.uuid4())
APPCONFIGS[configkey] = config

LOG.info("WSGI config used: %s", cfg_path)
appname = "gnocchi+" + conf.api.auth_mode
app = deploy.loadapp("config:" + cfg_path, name=appname,
global_conf={'configkey': configkey})
return cors.CORS(app, conf=conf)

这里启动时,调用了 pasteDeploy 的 loadapp(一个简单的函数)就可以部署WSGI,而且不需要知道WSGI应用的细节。PasteDeploy的工作模式是使用一个配置文件configure.ini去解析URL。gnocchi的配置是api-paste.ini:

1
2
3
4
5
6
7
8
9
10
11
12
13
14
15
16
17
18
19
20
21
22
23
24
25
26
27
28
29
30
31
32
33
34
35
36
37
38
39
40
41
42
43
44
45
46
[composite:gnocchi+noauth]
use = egg:Paste#urlmap
/ = gnocchiversions_pipeline
/v1 = gnocchiv1+noauth
/healthcheck = healthcheck

[composite:gnocchi+basic]
use = egg:Paste#urlmap
/ = gnocchiversions_pipeline
/v1 = gnocchiv1+noauth
/healthcheck = healthcheck

[composite:gnocchi+keystone]
use = egg:Paste#urlmap
/ = gnocchiversions_pipeline
/v1 = gnocchiv1+keystone
/healthcheck = healthcheck

[pipeline:gnocchiv1+noauth]
pipeline = http_proxy_to_wsgi gnocchiv1

[pipeline:gnocchiv1+keystone]
pipeline = http_proxy_to_wsgi keystone_authtoken gnocchiv1

[pipeline:gnocchiversions_pipeline]
pipeline = http_proxy_to_wsgi gnocchiversions

[app:gnocchiversions]
paste.app_factory = gnocchi.rest.app:app_factory
root = gnocchi.rest.VersionsController

[app:gnocchiv1]
paste.app_factory = gnocchi.rest.app:app_factory
root = gnocchi.rest.V1Controller

[filter:keystone_authtoken]
use = egg:keystonemiddleware#auth_token
oslo_config_project = gnocchi

[filter:http_proxy_to_wsgi]
use = egg:oslo.middleware#http_proxy_to_wsgi
oslo_config_project = gnocchi

[app:healthcheck]
use = egg:oslo.middleware#healthcheck
oslo_config_project = gnocchi

paste.app_factory 是一个应用的工厂函数,指明import对象的类型;值 gnocchi.rest.app:app_factory 指明具体加载的模块和方法。

1
2
3
4
5
6
7
8
9
10
11
12
13
14
15
16
17
def _setup_app(root, conf, indexer, storage, not_implemented_middleware):
app = pecan.make_app(
root,
hooks=(GnocchiHook(storage, indexer, conf),),
guess_content_type_from_ext=False,
)

if not_implemented_middleware:
app = webob.exc.HTTPExceptionMiddleware(NotImplementedMiddleware(app))

return app


def app_factory(global_config, **local_conf):
global APPCONFIGS
appconfig = APPCONFIGS.get(global_config.get('configkey'))
return _setup_app(root=local_conf.get('root'), **appconfig)

我们知道,要运行一个python的web服务,需要两个条件:

  • application
  • wsgi server

这里通过加载pecan.make_app ,返回了一个application,并设置 hooks ,加载数据库连接等信息。

这里的 root 就是上面api-paste.ini中的root = gnocchi.rest.V1Controller

1
2
3
4
5
6
7
8
9
10
11
12
13
14
15
16
17
18
19
20
21
22
23
24
25
26
27
28
29
30
31
32
class V1Controller(object):

def __init__(self):
self.sub_controllers = {
"search": SearchController(),
"archive_policy": ArchivePoliciesController(),
"archive_policy_rule": ArchivePolicyRulesController(),
"metric": MetricsController(),
"batch": BatchController(),
"resource": ResourcesByTypeController(),
"resource_type": ResourceTypesController(),
"aggregation": AggregationController(),
"capabilities": CapabilityController(),
"status": StatusController(),
"top": TopController(),
}
for name, ctrl in self.sub_controllers.items():
setattr(self, name, ctrl)

@pecan.expose('json')
def index(self):
return {
"version": "1.0",
"links": [
{"rel": "self",
"href": pecan.request.application_url}
] + [
{"rel": name,
"href": pecan.request.application_url + "/" + name}
for name in sorted(self.sub_controllers)
]
}

每次请求的路由的入口就是在这里了。具体怎么路由,可以看下之前写的分析pecan源码的文章。

简单看下监控数据存储的接口吧,POST /v1/batch/resources/metrics/measures?create_metrics=True

根据上面的路由转发,可以看到路径是V1Controller --> BatchController --> ResourcesBatchController --> ResourcesMetricsBatchController --> ResourcesMetricsMeasuresBatchController.post

1
2
3
4
5
6
7
8
9
10
11
12
13
14
15
16
17
18
19
20
21
22
23
24
25
26
27
28
29
30
31
32
33
34
35
36
37
38
39
40
41
42
43
44
45
46
47
48
49
50
51
52
53
54
55
56
57
58
59
60
61
62
63
64
65
66
67
68
69
70
71
72
73
74
75
76
77
78
79
80
81
82
83
84
85
86
87
88
89
90
91
class ResourcesMetricsMeasuresBatchController(rest.RestController):
@pecan.expose('json')
def post(self, create_metrics=False):
creator = pecan.request.auth_helper.get_current_user(
pecan.request.headers)
MeasuresBatchSchema = voluptuous.Schema(
{functools.partial(ResourceID, creator=creator):
{six.text_type: MeasuresListSchema}}
)

body = deserialize_and_validate(MeasuresBatchSchema)

known_metrics = []
unknown_metrics = []
unknown_resources = []
body_by_rid = {}
for original_resource_id, resource_id in body:
body_by_rid[resource_id] = body[(original_resource_id,
resource_id)]
names = body[(original_resource_id, resource_id)].keys()
#这里调用indexer从数据库中索引每一个metrics (gnocchi启动时应该会去加载gnocchi_resource...文件下定义的metrics)
metrics = pecan.request.indexer.list_metrics(
names=names, resource_id=resource_id)

known_names = [m.name for m in metrics]
# 创建 metrics
if strutils.bool_from_string(create_metrics):
already_exists_names = []
for name in names:
if name not in known_names:
metric = MetricsController.MetricSchema({
"name": name
})
try:
m = pecan.request.indexer.create_metric(
uuid.uuid4(),
creator=creator,
resource_id=resource_id,
name=metric.get('name'),
unit=metric.get('unit'),
archive_policy_name=metric[
'archive_policy_name'])
except indexer.NamedMetricAlreadyExists as e:
already_exists_names.append(e.metric)
except indexer.NoSuchResource:
unknown_resources.append({
'resource_id': six.text_type(resource_id),
'original_resource_id': original_resource_id})
except indexer.IndexerException as e:
# This catch NoSuchArchivePolicy, which is unlikely
# be still possible
abort(400, e)
else:
known_metrics.append(m)

if already_exists_names:
# Add metrics created in the meantime
known_names.extend(already_exists_names)
known_metrics.extend(
pecan.request.indexer.list_metrics(
names=already_exists_names,
resource_id=resource_id)
)
# 比较数据库中用metric_id查出来的metrics和现实发送过来的metrics是否一致。
elif len(names) != len(metrics):
unknown_metrics.extend(
["%s/%s" % (six.text_type(resource_id), m)
for m in names if m not in known_names])

known_metrics.extend(metrics)

if unknown_resources:
abort(400, {"cause": "Unknown resources",
"detail": unknown_resources})

if unknown_metrics:
abort(400, "Unknown metrics: %s" % ", ".join(
sorted(unknown_metrics)))

# 验证policy.yaml
for metric in known_metrics:
enforce("post measures", metric)
# 这里对metric进行储存,存进 incoming storage
storage = pecan.request.storage.incoming
with futures.ThreadPoolExecutor(max_workers=THREADS) as executor:
list(executor.map(lambda x: storage.add_measures(*x),
((metric,
body_by_rid[metric.resource_id][metric.name])
for metric in known_metrics)))

pecan.response.status = 202

这里主要是将发送过来的监控数据存进了 gnocchi 的 incoming storage

gnocchi-metricd

gnocchi 的metricd 服务是进行数据聚合,压缩,生成时间序列存储的。

入口:gnocchi/cli.py

1
2
3
4
5
6
7
8
9
10
11
12
13
14
15
16
17
18
19
20
21
22
23
24
25
26
27
28
29
30
31
32
33
34
35
36
37
38
39
40
41
42
43
44
45
46
47
48
49
50
51
52
53
54
55
56
57
58
59
60
61
62
def metricd():
conf = cfg.ConfigOpts()
conf.register_cli_opts([
cfg.IntOpt("stop-after-processing-metrics",
default=0,
min=0,
help="Number of metrics to process without workers, "
"for testing purpose"),
])
conf = service.prepare_service(conf=conf)

if conf.stop_after_processing_metrics:
metricd_tester(conf)
else:
MetricdServiceManager(conf).run()

class MetricdServiceManager(cotyledon.ServiceManager):
def __init__(self, conf):
super(MetricdServiceManager, self).__init__()
oslo_config_glue.setup(self, conf)

self.conf = conf
self.queue = multiprocessing.Manager().Queue()

self.add(MetricScheduler, args=(self.conf, self.queue))
self.metric_processor_id = self.add(
MetricProcessor, args=(self.conf, self.queue),
workers=conf.metricd.workers)
if self.conf.metricd.metric_reporting_delay >= 0:
self.add(MetricReporting, args=(self.conf,))
self.add(MetricJanitor, args=(self.conf,))

self.register_hooks(on_reload=self.on_reload)

def on_reload(self):
# NOTE(sileht): We do not implement reload() in Workers so all workers
# will received SIGHUP and exit gracefully, then their will be
# restarted with the new number of workers. This is important because
# we use the number of worker to declare the capability in tooz and
# to select the block of metrics to proceed.
self.reconfigure(self.metric_processor_id,
workers=self.conf.metricd.workers)

def run(self):
super(MetricdServiceManager, self).run()
self.queue.close()

# MetricScheduler服务用于每隔一定时间从incoming数据库中拉取临时的监控数据,放在多进程队列中
class MetricScheduler(MetricProcessBase):
#...

# 最重要的服务,数据聚合服务,它从MetricScheduler服务存放在多进程队列中获取需要处理的监控数据进行最终的聚合运算。
class MetricProcessor(MetricProcessBase):
#...

# MetricReporting服务每隔2分钟统计并以日志形式输出未处理的监控项个数和未处理的measure数目
class MetricReporting(MetricProcessBase):
#...

# MetricJanitor每隔已定时间清理已经删除的metric数据
class MetricJanitor(MetricProcessBase):
#...

这里用到了cotyledon库,不是本文重点,简单说可以看下这四个类 MetricScheduler、MetricProcessor、MetricReporting、MetricJanitor_run_job 方法,这是启动方法。

数据接收

1
2
3
4
5
6
7
8
9
10
11
12
13
14
15
16
17
18
19
20
21
22
23
24
25
26
27
28
29
30
31
32
33
class MetricScheduler(MetricProcessBase):
def _run_job(self):
try:
metrics = set(
self.store.incoming.list_metric_with_measures_to_process(
self.block_size, self.block_index))
if metrics and not self.queue.empty():
# NOTE(gordc): drop metrics we previously process to avoid
# handling twice
number_of_scheduled_metrics = len(metrics)
metrics = metrics - self.previously_scheduled_metrics
if (float(number_of_scheduled_metrics - len(metrics)) /
self.block_size > self.MAX_OVERLAP):
LOG.warning('Metric processing lagging scheduling rate. '
'It is recommended to increase the number of '
'workers or to lengthen processing interval.')
metrics = list(metrics)
for i in six.moves.range(0, len(metrics), self.BLOCK_SIZE):
self.queue.put(metrics[i:i + self.BLOCK_SIZE])
self.previously_scheduled_metrics = set(metrics)
LOG.debug("%d metrics scheduled for processing.", len(metrics))
except Exception:
LOG.error("Unexpected error scheduling metrics for processing",
exc_info=True)

class RedisStorage(_carbonara.CarbonaraBasedStorage):
def list_metric_with_measures_to_process(self, size, part, full=False):
match = redis.SEP.join([self.STORAGE_PREFIX, "*"])
keys = self._client.scan_iter(match=match, count=1000)
measures = set([k.decode('utf8').split(redis.SEP)[1] for k in keys])
if full:
return measures
return set(list(measures)[size * part:size * (part + 1)])

MetricScheduler 进行主要是从 gnocchi 的 incoming storage 去拉取数据,存进 queue,由于我这里用的是redis,所以进到RedisStorage

1
2
3
4
5
6
7
8
9
10
11
12
13
14
15
16
17
18
19
20
21
class MetricProcessor(MetricProcessBase):
name = "processing"

def __init__(self, worker_id, conf, queue):
super(MetricProcessor, self).__init__(worker_id, conf, 0)
self.queue = queue

def _run_job(self):
try:
try:
# 从存放监控数据的多进程队列中获取监控数据
metrics = self.queue.get(block=True, timeout=10)
except six.moves.queue.Empty:
# NOTE(sileht): Allow the process to exit gracefully every
# 10 seconds
return
# 然后调用self.store实际就是storage数据库(这里一般使用ceph)
self.store.process_background_tasks(self.index, metrics)
except Exception:
LOG.error("Unexpected error during measures processing",
exc_info=True)

这里从 queue 中拉取数据,通过 process_background_tasks 处理:

1
2
3
4
5
6
7
8
9
10
11
12
13
14
15
16
17
18
19
20
21
22
23
24
25
26
27
28
29
30
31
32
33
34
35
36
37
38
39
40
41
42
43
44
45
46
47
48
49
50
51
52
53
54
55
56
57
58
59
60
61
62
63
64
65
66
67
68
69
70
71
72
73
74
75
76
77
78
79
80
81
82
83
84
85
86
# gnocchi/storage/__init__.py 
class StorageDriver(object):
def process_background_tasks(self, index, metrics, sync=False):
"""Process background tasks for this storage.

This calls :func:`process_new_measures` to process new measures

:param index: An indexer to be used for querying metrics
:param block_size: number of metrics to process # 之前这里默认处理128个metrics,现在取消了
:param sync: If True, then process everything synchronously and raise
on error
:type sync: bool
"""
LOG.debug("Processing new measures")
try:
self.process_new_measures(index, metrics, sync)
except Exception:
if sync:
raise
LOG.error("Unexpected error during measures processing",
exc_info=True)

# gnocchi/storage/_carbonara.py
class CarbonaraBasedStorage(storage.StorageDriver):
def process_new_measures(self, indexer, metrics_to_process,
sync=False):
# 从 index 中根据 metric id 查询所有需要处理 metrics
metrics = indexer.list_metrics(ids=metrics_to_process)
# 一个 metric 的实例如下
"""
(Pdb) metrics[0].__dict__
{
'status': u 'active',
'_sa_instance_state': < sqlalchemy.orm.state.InstanceState object at 0x7ff3011e4790 > ,
'name': u 'memory.usage',
'creator': u '24f0a937351a415d89d499b5a5dae765:21214626fd5240cd87ce0bb5351db684',
'resource_id': UUID('2501d896-75e5-4a1e-b66c-0837f9764bde'),
'archive_policy': < gnocchi.indexer.sqlalchemy_base.ArchivePolicy object at 0x7ff3011e48d0 > ,
'archive_policy_name': u 'frequency_300s',
'id': UUID('31e8105c-70a0-4d58-99c9-92ec32e56fd3'),
'unit': u 'MB'
}
"""
# This build the list of deleted metrics, i.e. the metrics we have
# measures to process for but that are not in the indexer anymore.
# 删除measures文件下取到的无效metrics
deleted_metrics_id = (set(map(uuid.UUID, metrics_to_process))
- set(m.id for m in metrics))
for metric_id in deleted_metrics_id:
# NOTE(jd): We need to lock the metric otherwise we might delete
# measures that another worker might be processing. Deleting
# measurement files under its feet is not nice!
try:
with self._lock(metric_id)(blocking=sync):
self.incoming.delete_unprocessed_measures_for_metric_id(
metric_id)
except coordination.LockAcquireFailed:
LOG.debug("Cannot acquire lock for metric %s, postponing "
"unprocessed measures deletion", metric_id)

# 对 metric 逐个处理
for metric in metrics:
lock = self._lock(metric.id)
# Do not block if we cannot acquire the lock, that means some other
# worker is doing the job. We'll just ignore this metric and may
# get back later to it if needed.
if not lock.acquire(blocking=sync):
continue
try:
locksw = timeutils.StopWatch().start()
LOG.debug("Processing measures for %s", metric)
# process_measure_for_metric(self, metric): 返回待处理监控项对应的监控数据列表,
# 每个元素是时间戳和对应的值,样例:[(Timestamp('2018-04-19 02:29:04.925214'), 4.785732057729687)]
with self.incoming.process_measure_for_metric(metric) \
as measures:
self._compute_and_store_timeseries(metric, measures)
LOG.debug("Metric %s locked during %.2f seconds",
metric.id, locksw.elapsed())
except Exception:
LOG.debug("Metric %s locked during %.2f seconds",
metric.id, locksw.elapsed())
if sync:
raise
LOG.error("Error processing new measures", exc_info=True)
finally:
lock.release()

这里主要做了几件事:

  1. 根据待处理的监控项集合,判断如果有已经删除的监控项,则删除对应incoming storage中的监控数据
  2. 遍历待处理的监控项列表,获取每个监控项在incoming storage中的监控数据列表,然后根据监控项及其待处理监控数据
    调用_compute_and_store_timeseries方法来计算并存储时间序列

数据聚合

1
2
3
4
5
6
7
8
9
10
11
12
13
14
15
16
17
18
19
20
21
22
23
24
25
26
27
28
29
30
31
32
33
34
35
36
37
38
39
40
41
42
43
44
45
46
47
48
49
50
51
52
53
54
55
56
57
58
59
60
61
62
63
64
65
66
67
68
69
70
71
72
73
74
75
76
77
78
79
80
81
82
83
84
85
86
87
88
89
90
91
92
93
94
95
96
97
98
99
100
101
102
103
104
def _compute_and_store_timeseries(self, metric, measures):
if len(measures) == 0:
LOG.debug("Skipping %s (already processed)", metric)
return
# 步骤一:对measures进行排序
measures = sorted(measures, key=operator.itemgetter(0))

"""
(Pdb) p metric
<Metric 01f0658b-f147-482b-bca9-f474a79320dc>

(Pdb) p metric.__dict__
{'status': u'active', '_sa_instance_state': <sqlalchemy.orm.state.InstanceState object at 0x5536b50>, 'name': u'cpu_util', 'creator': u'6a18a77646104fcb93e92cb3daf10c91:55e9bc42c004471b9111ffbb516a9bbe', 'resource_id': UUID('d872305c-94b3-4f35-a2d5-602af219945d'), 'archive_policy': <gnocchi.indexer.sqlalchemy_base.ArchivePolicy object at 0x5536c50>, 'archive_policy_name': u'frequency_300s', 'id': UUID('01f0658b-f147-482b-bca9-f474a79320dc'), 'unit': None}

(Pdb) p type(metric)
<class 'gnocchi.indexer.sqlalchemy_base.Metric'>

(Pdb) p measures
[(Timestamp('2018-04-19 04:21:08.054995'), 4.799075611984741),
(Timestamp('2018-04-19 05:10:10.429245'), 4.574397482330608),
(Timestamp('2018-04-19 04:08:07.438367'), 4.597624310196946)]

(Pdb) p metric.archive_policy
<gnocchi.indexer.sqlalchemy_base.ArchivePolicy object at 0x5536c50>

(Pdb) p metric.archive_policy.__dict__
{'back_window': 0, 'definition': [{'points': 300, 'granularity': 300.0, 'timespan': 90000.0}, {'points': 100, 'granularity': 900.0, 'timespan': 90000.0}, {'points': 100, 'granularity': 7200.0, 'timespan': 720000.0}, {'points': 200, 'granularity': 86400.0, 'timespan': 17280000.0}], '_sa_instance_state': <sqlalchemy.orm.state.InstanceState object at 0x5536c90>, 'name': u'frequency_300s', 'aggregation_methods': set([u'count', u'max', u'sum', u'mean', u'min'])}

(Pdb) p metric.archive_policy.aggregation_methods
set([u'count', u'max', u'sum', u'mean', u'min'])

(Pdb) p metric.archive_policy.max_block_size
86400.0

(Pdb) p metric.archive_policy.back_window
0

(Pdb) p metric.archive_policy.definition
[{'points': 300, 'granularity': 300.0, 'timespan': 90000.0}, {'points': 100, 'granularity': 900.0, 'timespan': 90000.0}, {'points': 100, 'granularity': 7200.0, 'timespan': 720000.0}, {'points': 200, 'granularity': 86400.0, 'timespan': 17280000.0}]
"""
agg_methods = list(metric.archive_policy.aggregation_methods)
block_size = metric.archive_policy.max_block_size
back_window = metric.archive_policy.back_window
definition = metric.archive_policy.definition

try:
# 步骤二:获取未聚合的时间序列数据进行反序列化,来重新构建为新的时间序列
ts = self._get_unaggregated_timeserie_and_unserialize(
metric, block_size=block_size, back_window=back_window)
except storage.MetricDoesNotExist:
try:
self._create_metric(metric)
except storage.MetricAlreadyExists:
# Created in the mean time, do not worry
pass
ts = None
except CorruptionError as e:
LOG.error(e)
ts = None

if ts is None:
ts = carbonara.BoundTimeSerie(block_size=block_size,
back_window=back_window)
current_first_block_timestamp = None
else:
current_first_block_timestamp = ts.first_block_timestamp()

computed_points = {"number": 0}

def _map_add_measures(bound_timeserie):
tstamp = max(bound_timeserie.first, measures[0][0])

new_first_block_timestamp = bound_timeserie.first_block_timestamp()
computed_points['number'] = len(bound_timeserie)
for d in definition:
ts = bound_timeserie.group_serie(
d.granularity, carbonara.round_timestamp(
tstamp, d.granularity * 10e8))
self._map_in_thread(
self._add_measures,
((aggregation, d, metric, ts,
current_first_block_timestamp,
new_first_block_timestamp)
for aggregation in agg_methods))
# 步骤三:计算聚合后的时间序列
with timeutils.StopWatch() as sw:
ts.set_values(measures,
before_truncate_callback=_map_add_measures,
ignore_too_old_timestamps=True)

elapsed = sw.elapsed()
number_of_operations = (len(agg_methods) * len(definition))
perf = ""
if elapsed > 0:
perf = " (%d points/s, %d measures/s)" % (
((number_of_operations * computed_points['number']) /
elapsed),
((number_of_operations * len(measures)) / elapsed)
)
LOG.debug("Computed new metric %s with %d new measures "
"in %.2f seconds%s",
metric.id, len(measures), elapsed, perf)
# 步骤四:更新未聚合的时间序列
self._store_unaggregated_timeserie(metric, ts.serialize())
  1. 步骤1. 对待处理监控数据按照时间从旧到新排序,获取监控项中聚合方法,采样间隔等信息

  2. 步骤2. 调用_get_unaggregated_timeserie_and_unserialize方法获取未聚合的时间序列数据进行反序列化,来重新构建为新的时间序列,具体步骤如下
    2.0. 先根据监控项id构建需要获取的对象名称,形如:gnocchi_01f0658b-f147-482b-bca9-f474a79320dc_none_v3
    从ceph中读取该对象存储的值(是一个字符串)

    ​ 2.1. 先解压从步骤0中读取的数据(实际是一个字符串),前面一半为时间,后面一半为时间对应的值

    ​ 2.2. 解压的时间由于采用差值,所以累加计算每个时间;

    ​ 2.3. 将时间列表,值列表来构建时间序列,然后根据block_size(实际是最大采样间隔)对序列计算出这个时间序列中最后一个数据,在一天之前的起始时间,以该时间为基础,对此时间序列进行切片,得到最终需要处理的时间序列

    ​ 2.4. 用步骤3的时间序列,block_size等实例化并返回最终需要处理的BoundTimeSerie

  3. 步骤3 计算聚合后的时间序列,具体调用ts.set_values方法处理过程如下

    ​ 3.1. 对给定的已经合并了待处理数据生成的时间序列和未聚合的时间序列的合并时间序列boundTimeSerie进行如下操作

    ​ 3.2. 遍历归档策略,根据采样间隔,聚合方法:

    ​ 计算每个boundTimeSerie聚合后的时间序列;

    ​ 并对该聚合的时间序列分割,计算分割序列的偏移量和对应序列化的值;

    ​ 根据偏移量,将序列化的值写入到对应的ceph对象

    ​ 总结:步骤3实现了: 计算聚合后的时间序列,将聚合后的时间序列写入到ceph对象中

  4. 步骤4. 更新未聚合的时间序列,具体调用_store_unaggregated_timeserie方法处理过程如下

    ​ 4.1. 对时间序列的索引进行numpy.diff的求差值操作,并
    ​ 在所求的索引差值列表的最前面加上该时间序列的第一个值,
    ​ 得到差值索引列表

    ​ 4.2. 对差值索引列表的类型转换为uint64类型

    ​ 4.3. 对时间序列的值列表类型转换为浮点型

    ​ 4.4 对差值索引列表转换为字节 + 对时间序列的值列表转换为字节,
    ​ 得到字符串

    ​ 4.5. 对该字符串调用lz4.dumps进行压缩,返回该压缩后的字符串

    ​ 4.6 构建类似gnocchi_01f0658b-f147-482b-bca9-f474a79320dc_none_v3的对象名称,
    ​ 向该对象中写入未聚合的时间序列的压缩后的字符串
    ​ 该字符串序列化前的前半部分为:时间序列索引,后半部分为时间序列值

步骤1. 对待处理监控数据按照时间从旧到新排序,获取监控项中聚合方法,采样间隔等信息

1
2
3
4
5
6
7
def _compute_and_store_timeseries(self, metric, measures):
if len(measures) == 0:
LOG.debug("Skipping %s (already processed)", metric)
return
# 对measures进行排序
measures = sorted(measures, key=operator.itemgetter(0))
......

步骤2. 调用_get_unaggregated_timeserie_and_unserialize方法获取未聚合的时间序列数据进行反序列化,来重新构建为新的时间序列,

1
2
3
4
5
6
7
8
9
10
11
12
13
14
15
16
17
18
19
20
21
22
23
24
25
26
27
28
29
30
31
class CarbonaraBasedStorage(storage.StorageDriver):
def _get_unaggregated_timeserie_and_unserialize(
self, metric, block_size, back_window):
"""
_get_unaggregated_timeserie
s0. 先根据监控项id构建需要获取的对象名称,形如:gnocchi_01f0658b-f147-482b-bca9-f474a79320dc_none_v3
从ceph中读取该对象存储的值(是一个字符串)
unserialize
s1. 先解压从步骤0中读取的数据(实际是一个字符串),前面一半为时间,后面一半为时间对应的值
s2. 解压的时间由于采用差值,所以累加计算每个时间;
s3. 将时间列表,值列表来构建时间序列,然后根据block_size对序列计算出这个时间序列中最后一个数据,
在一天之前的起始时间,以该时间为基础,对此时间序列进行切片,得到最终需要处理的时间序列
s4. 用步骤s3的时间序列,block_size等实例化并返回最终需要处理的BoundTimeSerie
"""
with timeutils.StopWatch() as sw:
raw_measures = (
self._get_unaggregated_timeserie(
metric)
)
LOG.debug(
"Retrieve unaggregated measures "
"for %s in %.2fs",
metric.id, sw.elapsed())
try:
# 解压,计算
return carbonara.BoundTimeSerie.unserialize(
raw_measures, block_size, back_window)
except ValueError:
raise CorruptionError(
"Data corruption detected for %s "
"unaggregated timeserie" % metric.id)

变量分析:

1
2
3
4
5
6
7
8
9
10
11
(Pdb) p metric
<Metric 01f0658b-f147-482b-bca9-f474a79320dc>
(Pdb) p metric.__dict__
{'status': u'active', '_sa_instance_state': <sqlalchemy.orm.state.InstanceState object at 0x5536b50>, 'name': u'cpu_util', 'creator': u'6a18a77646104fcb93e92cb3daf10c91:55e9bc42c004471b9111ffbb516a9bbe', 'resource_id': UUID('d872305c-94b3-4f35-a2d5-602af219945d'), 'archive_policy': <gnocchi.indexer.sqlalchemy_base.ArchivePolicy object at 0x5536c50>, 'archive_policy_name': u'frequency_300s', 'id': UUID('01f0658b-f147-482b-bca9-f474a79320dc'), 'unit': None}

(Pdb) p block_size
86400.0
(Pdb) p back_window
0
(Pdb) p raw_measures
'\xd0\x06\x00\x00\xf5\t\x00T\r\x15\xc4\xc7#\x16\x00XG\xf8\r\x00\x00\x00\x00"\xe23\x0e\x00\x00\x00\x10\x00\x04\x18\x00\x04\x08\x00\x0f \x00-\x04H\x00\x04\x08\x00\x0fP\x00\r\x0f(\x00-\x0f`\x00\r\x04 \x00?\xec|o\xf8\x00\x1a\x048\x00\x0f\xa0\x00\x15\x0c`\x00\x0c@\x00\x04H\x00\x04\x08\x00\x0f \x00\r\x0f(\x00\x1d\x0f0\x00\x1d\x0f\x80\x005\x0fH\x005\x0f\xc0\x00e\x0fx\x00\x05\xf8\x05@Ys\x07\x00\x00\x00\x00\x18\xee\x84\x06\x00\x00\x00\x00\xb0\x8e\xf0\x1b\x18\x001\xe2\x88\xc0\x18\x001v\xbe7(\x00\t\x02\x00#\xf0?\x0f\x00\x12@\x08\x00\x13\x08\x08\x00\x13\x10\x08\x00\x13\x14\x08\x00\x13\x18\x08\x00\x13\x1c\x08\x00\x13 \x08\x00\x13"\x08\x00\x13$\x08\x00\x13&\x08\x00\x13(\x08\x00\x13*\x08\x00\x13,\x08\x00\x13.\x08\x00\x130\x08\x00\x131\x08\x00\x132\x08\x00\x133\x08\x00\x134\x08\x00\x135\x08\x00\x136\x08\x00\x137\x08\x00\x138\x08\x00\x139\x08\x00\x13:\x08\x00\x13;\x08\x00\x13<\x08\x00\x13=\x08\x00\x13>\x08\x00\x13?\x08\x00\x12@\x08\x00\x13\x80\x08\x00#\x00A\x10\x00\x03\x08\x00#\x00B\x10\x00\x03\x08\x00#\x00C\x10\x00\x03\x08\x00#\x00D\x10\x00\x03\x08\x00#\x00E\x10\x00\x03\x08\x00#\x00F\x10\x00\x03\x08\x00#\x00G\x10\x00\x03\x08\x00#\x00H\x10\x00\x03\x08\x00#\x00I\x10\x00\x03\x08\x00#\x00J\x10\x00\x03\x08\x00#\x00K\x10\x00\x03\x08\x00#\x00L\x10\x00\x03\x08\x00#\x00M\x10\x00\x03\x08\x00#\x00N\x10\x00\x03\x08\x00#\x00O\x10\x00\x03\x08\x00"\x00P\x10\x00\x13@\x08\x00\x13\x80\x08\x00\x13\xc0\x08\x00#\x00Q \x00\x03\x08\x00\x13\x80\x08\x00\x13\xc0\x08\x00#\x00R \x00\x03\x08\x00\x13\x80\x08\x00\x13\xc0\x08\x00#\x00S \x00\x03\x08\x00\x13\x80\x08\x00\x13\xc0\x08\x00#\x00T \x00\x03\x08\x00\x13\x80\x08\x00\x13\xc0\x08\x00#\x00U \x00\x03\x08\x00\x13\x80\x08\x00\x13\xc0\x08\x00#\x00V \x00\x03\x08\x00\x13\x80\x08\x00\x13\xc0\x08\x00#\x00W \x00\x03\x08\x00\x13\x80\x08\x00\x13\xc0\x08\x00#\x00X \x00\x03\x08\x00\x13\x80\x08\x00\x13\xc0\x08\x00#\x00Y \x00\x03\x08\x00\x13\x80\x08\x00\x04\x02\x00\x13\xc0\x10\x00"@Z(\x00\x04\x02\x00\xb0\x80Z@\x00\x00\x00\x00\x00\x00\xf0?'
1
2
3
4
5
6
7
8
9
10
11
12
13
14
15
16
17
18
19
20
21
22
23
24
25
26
27
28
29
30
31
32
33
34
35
36
37
38
class BoundTimeSerie(TimeSerie):
@classmethod
def unserialize(cls, data, block_size, back_window):
"""
根据ceph中获得的监控数据(包含时间和值)的字符串,即data:
s1. 先解压数据,前面一半为时间,后面一半为时间对应的值
s2. 解压的时间由于采用差值,所以累加计算每个时间;
s3. 将时间列表,值列表来构建时间序列,然后根据block_size对序列计算出这个时间序列中最后一个数据,
在一天之前的起始时间,以该时间为基础,对此时间序列进行切片,得到最终需要处理的时间序列
s4. 用步骤s3的时间序列,block_size等实例化并返回最终需要处理的BoundTimeSerie
"""
uncompressed = lz4.loads(data)
"""
(Pdb) nb_points
109
"""
nb_points = (
len(uncompressed) // cls._SERIALIZATION_TIMESTAMP_VALUE_LEN
)
timestamps_raw = uncompressed[
:nb_points*cls._SERIALIZATION_TIMESTAMP_LEN]
timestamps = numpy.frombuffer(timestamps_raw, dtype='<Q')
timestamps = numpy.cumsum(timestamps)
timestamps = numpy.array(timestamps, dtype='datetime64[ns]')
values_raw = uncompressed[nb_points*cls._SERIALIZATION_TIMESTAMP_LEN:]
values = numpy.frombuffer(values_raw, dtype='<d')

return cls.from_data(
pandas.to_datetime(timestamps),
values,
block_size=block_size,
back_window=back_window)

@classmethod
def from_data(cls, timestamps=None, values=None,
block_size=None, back_window=0):
return cls(pandas.Series(values, timestamps),
block_size=block_size, back_window=back_window)

步骤3. 计算聚合后的时间序列,具体调用ts.set_values方法处理过程如下

经过步骤2,我们得到了ts对象:

1
2
3
4
5
6
7
8
9
10
11
12
13
14
15
16
17
18
19
20
21
22
23
24
25
26
27
28
29
30
31
32
33
34
35
36
37
38
39
40
41
42
43
44
45
46
47
48
49
50
51
52
53
54
55
56
57
58
59
60
61
62
63
64
65
66
67
68
69
"""
(Pdb) ts
<gnocchi.carbonara.BoundTimeSerie object at 0x7fbdb91fd5d0>
(Pdb) ts.__dict__
{'back_window': 0, 'block_size': <86400000000000 * Nanos>,
'ts':
2020-07-21 13:32:18 0.0
2020-07-21 13:33:18 1.0
2020-07-21 13:34:19 2.0
2020-07-21 13:35:19 3.0
2020-07-21 13:36:19 4.0
2020-07-21 13:37:19 5.0
2020-07-21 13:38:20 6.0
2020-07-21 13:39:20 7.0
2020-07-21 13:40:20 8.0
2020-07-21 13:41:20 9.0
2020-07-21 13:42:21 10.0
2020-07-21 13:43:21 11.0
2020-07-21 13:44:21 12.0
2020-07-21 13:45:21 13.0
2020-07-21 13:46:21 14.0
2020-07-21 13:47:21 15.0
2020-07-21 13:48:22 16.0
2020-07-21 13:49:22 17.0
2020-07-21 13:50:22 18.0
2020-07-21 13:51:22 19.0
2020-07-21 13:52:22 20.0
2020-07-21 13:53:23 21.0
2020-07-21 13:54:23 22.0
2020-07-21 13:55:23 23.0
2020-07-21 13:56:23 24.0
2020-07-21 13:57:23 25.0
2020-07-21 13:58:24 26.0
2020-07-21 13:59:24 27.0
2020-07-21 14:00:25 28.0
2020-07-21 14:01:25 29.0
...
2020-07-21 14:51:40 79.0
2020-07-21 14:52:40 80.0
2020-07-21 14:53:41 81.0
2020-07-21 14:54:41 82.0
2020-07-21 14:55:41 83.0
2020-07-21 14:56:41 84.0
2020-07-21 14:57:41 85.0
2020-07-21 14:58:42 86.0
2020-07-21 14:59:42 87.0
2020-07-21 15:00:42 88.0
2020-07-21 15:01:42 89.0
2020-07-21 15:02:42 90.0
2020-07-21 15:03:43 91.0
2020-07-21 15:04:43 92.0
2020-07-21 15:05:43 93.0
2020-07-21 15:06:43 94.0
2020-07-21 15:07:43 95.0
2020-07-21 15:08:44 96.0
2020-07-21 15:09:44 97.0
2020-07-21 15:10:44 98.0
2020-07-21 15:11:44 99.0
2020-07-21 15:12:44 100.0
2020-07-21 15:13:45 101.0
2020-07-21 15:14:45 102.0
2020-07-21 15:15:17 0.0
2020-07-21 15:15:45 103.0
2020-07-21 15:17:45 105.0
2020-07-21 15:18:17 0.0
2020-07-21 15:18:46 106.0
2020-07-21 15:19:17 1.0
Length: 109, dtype: float64}
"""
1
2
3
4
5
6
7
8
9
10
11
12
13
14
15
16
17
18
19
20
21
22
23
24
25
26
27
28
29
30
31
32
33
34
35
36
37
38
39
40
41
class BoundTimeSerie(TimeSerie):
"""
1. 从未聚合的时间序列最后一个时间lastTime为基点,找出能够被最大采样间隔(例如86400)整除且最接近lasTtime
的时间作为最近的起始时间firstTime
2. 然后从待处理监控数据列表中过滤出时间 >= firstTime的待处理监控数据
3. 将待处理的监控数据(有时间,值的元组组成的列表),构建为待处理时间序列,并检查
重复和是否是单调的,然后用原来未聚合的时间序列和当前待处理时间序列进行合并操作,
得到新生成的时间序列
"""
def set_values(self, values, before_truncate_callback=None,
ignore_too_old_timestamps=False):
# NOTE: values must be sorted when passed in.
""""""
"""
(Pdb) a
self = <gnocchi.carbonara.BoundTimeSerie object at 0x7fbdb91fd5d0>
values = [(Timestamp('2020-07-21 15:19:46'), 107.0)]
before_truncate_callback = <function _map_add_measures at 0x7fbdb91f6f50>
ignore_too_old_timestamps = True
"""
if self.block_size is not None and not self.ts.empty:
first_block_timestamp = self.first_block_timestamp()
if ignore_too_old_timestamps:
for index, (timestamp, value) in enumerate(values):
if timestamp >= first_block_timestamp:
values = values[index:]
break
else:
values = []
else:
# Check that the smallest timestamp does not go too much back
# in time.
smallest_timestamp = values[0][0]
if smallest_timestamp < first_block_timestamp:
raise NoDeloreanAvailable(first_block_timestamp,
smallest_timestamp)
super(BoundTimeSerie, self).set_values(values)
# before_truncate_callback = <function _map_add_measures at 0x7fbdb91f6f50>
if before_truncate_callback:
before_truncate_callback(self)
self._truncate()
1
2
3
4
5
6
7
8
9
10
11
12
13
14
15
16
17
18
19
20
21
22
23
24
25
26
27
28
29
30
31
32
33
34
35
36
37
38
39
40
41
42
43
44
45
46
47
48
49
50
51
52
53
54
55
56
57
58
59
60
61
62
63
64
65
66
67
68
69
70
71
72
73
74
75
76
77
78
79
80
81
82
83
84
85
86
87
88
89
90
91
92
93
94
95
96
97
98
99
100
101
102
103
104
105
106
107
108
109
110
111
112
113
114
115
116
117
118
119
120
121
122
123
124
125
126
127
128
129
130
131
class CarbonaraBasedStorage(storage.StorageDriver):
def __init__(self, conf, incoming):
...
self._map_in_thread = self._map_no_thread
...

@staticmethod
def _map_no_thread(method, list_of_args):
return list(itertools.starmap(method, list_of_args))

'''
_map_add_measures(bound_timeserie):
1. 对给定的已经合并了待处理数据生成的时间序列和未聚合的时间序列的合并时间序列boundTimeSerie进行如下操作
2. 遍历归档策略,根据采样间隔,聚合方法:
计算每个boundTimeSerie聚合后的时间序列;
并对该聚合的时间序列分割,计算分割序列的偏移量和对应序列化的值;
根据偏移量,将序列化的值写入到对应的ceph对象
总结:这个函数实现了: 计算聚合后的时间序列,将聚合后的时间序列写入到ceph对象中
'''
def _map_add_measures(bound_timeserie):
""""""
# NOTE (gordc): bound_timeserie is entire set of
# unaggregated measures matching largest
# granularity. the following takes only the points
# affected by new measures for specific granularity
tstamp = max(bound_timeserie.first, measures[0][0])

new_first_block_timestamp = bound_timeserie.first_block_timestamp()
computed_points['number'] = len(bound_timeserie)
for d in definition:
'''
group_serie(self, granularity, start=0):
1.根据给定的时间开始时间,计算过滤后的时间序列,按照采样间隔计算分组后的时间索引列表
2.对分组后的时间序列索引列表赋值,对时间序列的索引按照采样间隔做去重处理,得到新的索引列表和次数列表
'''
ts = bound_timeserie.group_serie(
d.granularity, carbonara.round_timestamp(
tstamp, d.granularity * 10e8))

self._map_in_thread(
self._add_measures,
((aggregation, d, metric, ts,
current_first_block_timestamp,
new_first_block_timestamp)
for aggregation in agg_methods))

'''
根据给定的聚合方法,归档策略等信息,以及已经分组的时间序列,计算聚合后的时间序列,
并将聚合后的时间序列写入到ceph的对象中

1. 根据给定的聚合方法,对已经索引分组的时间序列等先计算得到聚合后的时间序列
2. 对时间序列做截断操作,得到截断后的时间序列,最终用这些参数初始化AggregatedTimeSerie对象
3. 对已经计算好的时间序列进行分割(例如每个时间序列最多保存3600个点),对每个分割后的时间序列
计算写入到对象的偏移量值,以及对应序列化的值,然后写入ceph对象;
4. 重复步骤3,直到所有被分割的时间序列都写入到了ceph对象
'''
def _add_measures(self, aggregation, archive_policy_def,
metric, grouped_serie,
previous_oldest_mutable_timestamp,
oldest_mutable_timestamp):

ts = carbonara.AggregatedTimeSerie.from_grouped_serie(
grouped_serie, archive_policy_def.granularity,
aggregation, max_size=archive_policy_def.points)

# Don't do anything if the timeserie is empty
if not ts:
return

# We only need to check for rewrite if driver is not in WRITE_FULL mode
# and if we already stored splits once
need_rewrite = (
not self.WRITE_FULL
and previous_oldest_mutable_timestamp is not None
)

if archive_policy_def.timespan or need_rewrite:
existing_keys = self._list_split_keys_for_metric(
metric, aggregation, archive_policy_def.granularity)

# First delete old splits
if archive_policy_def.timespan:
oldest_point_to_keep = ts.last - datetime.timedelta(
seconds=archive_policy_def.timespan)
oldest_key_to_keep = ts.get_split_key(oldest_point_to_keep)
oldest_key_to_keep_s = str(oldest_key_to_keep)
for key in list(existing_keys):
# NOTE(jd) Only delete if the key is strictly inferior to
# the timestamp; we don't delete any timeserie split that
# contains our timestamp, so we prefer to keep a bit more
# than deleting too much
if key < oldest_key_to_keep_s:
self._delete_metric_measures(
metric, key, aggregation,
archive_policy_def.granularity)
existing_keys.remove(key)
else:
oldest_key_to_keep = carbonara.SplitKey(0, 0)

# Rewrite all read-only splits just for fun (and compression). This
# only happens if `previous_oldest_mutable_timestamp' exists, which
# means we already wrote some splits at some point – so this is not the
# first time we treat this timeserie.
if need_rewrite:
previous_oldest_mutable_key = str(ts.get_split_key(
previous_oldest_mutable_timestamp))
oldest_mutable_key = str(ts.get_split_key(
oldest_mutable_timestamp))

if previous_oldest_mutable_key != oldest_mutable_key:
for key in existing_keys:
if previous_oldest_mutable_key <= key < oldest_mutable_key:
LOG.debug(
"Compressing previous split %s (%s) for metric %s",
key, aggregation, metric)
# NOTE(jd) Rewrite it entirely for fun (and later for
# compression). For that, we just pass None as split.
self._store_timeserie_split(
metric, carbonara.SplitKey(
float(key), archive_policy_def.granularity),
None, aggregation, archive_policy_def,
oldest_mutable_timestamp)

for key, split in ts.split():
if key >= oldest_key_to_keep:
LOG.debug(
"Storing split %s (%s) for metric %s",
key, aggregation, metric)
self._store_timeserie_split(
metric, key, split, aggregation, archive_policy_def,
oldest_mutable_timestamp)

步骤4. 更新未聚合的时间序列,具体调用_store_unaggregated_timeserie方法处理过程如下

1
2
3
def _compute_and_store_timeseries(self, metric, measures):
...
self._store_unaggregated_timeserie(metric, ts.serialize())
1
2
3
4
5
6
7
8
9
10
11
12
13
14
15
16
17
18
19
20
21
22
23
24
25
26
27
28
29
30
31
32
33
34
35
36
# ts.serialize()
class BoundTimeSerie(TimeSerie):
"""
1. 对时间序列的索引进行numpy.diff的求差值操作,并
在所求的索引差值列表的最前面加上该时间序列的第一个值,
得到差值索引列表
2. 对差值索引列表的类型转换为uint64类型
3. 对时间序列的值列表类型转换为浮点型
4. 对差值索引列表转换为字节 + 对时间序列的值列表转换为字节,
得到字符串
5. 对该字符串调用lz4.dumps进行压缩,返回该压缩后的字符串
"""
def serialize(self):
# NOTE(jd) Use a double delta encoding for timestamps
timestamps = numpy.insert(numpy.diff(self.ts.index),
0, self.first.value)
timestamps = numpy.array(timestamps, dtype='<Q')
values = numpy.array(self.ts.values, dtype='<d')
payload = (timestamps.tobytes() + values.tobytes())
return lz4.dumps(payload)

class CephStorage(_carbonara.CarbonaraBasedStorage):
......
"""
构建类似gnocchi_01f0658b-f147-482b-bca9-f474a79320dc_none_v3的对象名称,向
该对象中写入未聚合的时间序列的压缩后的字符串
该字符串前半部分为:时间序列索引,后半部分为时间序列值
"""
def _store_unaggregated_timeserie(self, metric, data, version=3):
self.ioctx.write_full(
self._build_unaggregated_timeserie_path(metric, version), data)

@staticmethod
def _build_unaggregated_timeserie_path(metric, version):
return (('gnocchi_%s_none' % metric.id)
+ ("_v%s" % version if version else ""))

参考:

pecan 文档

pecan

Gnocchi 总览

Gnocchi: 2 、Gnocchi架构及其基础

Gnocchi: 3、Gnocchi命令行使用

OpenStack实践分享:OpenStack Gnocchi项目

Ceilometer和Gnocchi的监控架构解析

Gnocchi 9、gnocchi聚合算法分析

-------------本文结束 感谢您的阅读-------------
作者Magiceses
有问题请 留言 或者私信我的 微博
满分是10分的话,这篇文章你给几分